PB&J muffins

Hello, lovelies!

Not to get all Bob Ross-ey on you, but these are happy little muffins. It’s a Paula Deen recipe (that involves only 3 Tbsp. butter, I might add) and were apparently quite a hit at The Yankee’s office. Yay!

PB&J muffins

Ingredients

  • 2 cups AP flour
  • 1/4 cup packed light brown sugar
  • 2 Tbsp. baking powder
  • 1/2 tsp salt
  • 1/2 cup plus 1 tsp. creamy peanut butter
  • 1 cup milk
  • 1 egg, lightly beaten
  • 3 Tbsp. butter, melted
  • 1/4 cup thick jam (not jelly!)
  • 1/3 cup honey roasted peanuts, chopped (optional)

Instructions

  1. Preheat the oven to 350F and line 12 muffin cups with paper liners or spray with nonstick spray
  2. Combine flour, sugar, baking powder and salt in the food processor; add in all the peanut butter and pulse till it looks like coarse crumbs (think biscuit making); add in milk, egg, and melted butter and pulse till just combined
  3. Scoop half the batter into the muffin cups, then drop a teaspoon of jam on each; cover with the remaining batter and top with chopped peanuts if you’re using them
  4. Bake until muffins are light golden, about 15-20 minutes; cool on a wire rack (or eat immediately — these are SO GOOD still warm)


Paula says these will keep for 1-2 days, but they lasted about 1-2 hours in The Yankee’s office. So there you have it. 🙂


Blue velvet cupcakes

Ohai, cupcakes.

I’m kind of at a loss for words with these. Can you imagine how good they were by looking at the pictures? Because let me assure you… they were BETTER than whatever you’re thinking.

Kiddo and I wanted to do something lovely for our local police force because they are awesome. They always take the time to say hi to Kiddo and all the other kids when they’re cruising our neighborhood, they do all they can to help with the issue of our neighbor’s dog that will. not. quit. barking. ever. and they solved both lame crimes of which we’ve been a victim in the last year. They’re awesome. So what better for the boys in blue than blue velvet cupcakes?

I found this recipe at the incredible Sprinkle Bakes. Aren’t those great? She was SO helpful in helping me adapt the recipe to the food coloring I had to that perfect Cookie Monster shade of blue she showcases. It’s exactly what I wanted them to look like! She adapted her cupcake recipe from Paula Deen’s recipe; I adapted it with Sprinkle Bake’s help only to use all gel food coloring. The frosting is all Sprinkle Bakes.

A note on gel food coloring: this Wilton gel is what I used; I got mine at Joann, and I believe I’ve seen it at Michael’s as well. The ready to use gel icing for cookie and cake decorating (like this) is not the same thing, and will not get you the color you’re looking for.

Blue velvet cupcakes

Yield: I got 26 cupcakes out of this

Ingredients

For the cupcakes
    • 2 cups sugar
    • ½ pound (2 sticks) butter, at room temperature
    • 2 eggs
    • 1 tablespoon cocoa powder
    • 1 Tbsp Wilton royal blue gel food coloring
    • 1 small dab of violet gel food coloring (I dipped in a toothpick and used that much)
    • 2 ½ cups cake flour
    • 1 teaspoon salt
    • 1 cup buttermilk
    • 1 teaspoon vanilla extract
    • ½ teaspoon baking soda
    • 1 tablespoon vinegar
For the frosting
  • 1 pound cream cheese, softened
  • 2 sticks butter, softened
  • 1 teaspoon vanilla extract
  • 4 cups sifted confectioners’ sugar (I hate sifting; I whir it up in the food processor instead to aerate and get lumps out)

Instructions

Make the cupcakes
    1. Preheat your oven to 350 F and line cupcake pans with liners
    2. Cream sugar and butter in mixing bowl till light and fluffy, then add eggs one at a time, mixing well after each egg
    3. Mix cocoa and food coloring together to make a paste — this took a while to mix thoroughly with all gel, but it came together nicely; add this paste to sugar mixture and mix well again
    4. Sift (or buzz in food processor) flour and salt, and add to creamed mixture a bit at a time, alternating with buttermilk, then mix in vanilla
    5. Combine baking soda and vinegar in a small bowl and add to cake batter; mix just to combine
    6. Scoop thick batter into cupcake liners, filling about 2/3 full, and bake for probably 25-30 minutes, but start checking at 20 — mine were done at about the 22/23 minute mark; watch for toothpick inserted in center to come out clean
    7. Remove cupcakes from oven and allow cool completely on a wire rack
Now make frosting!
  1. Beat cream cheese, butter and vanilla with electric mixer until nice and smooth

Frosting time! I use a giant star tip from Bake it Pretty, or The Place I Could Spend All My Monies (and the stardust). I dusted on a little edible blue glitter on top because hey, why not.

Ice cream cone cupcakes

It’s another episode of cooking with kids!

With The Yankee out of town, I planned a weekend of all kids, all the time. These were made with help from The Kiddo, five year old twins and a nine year old. Woohoo! With all that “help” speed was off the essence. For this project we used:

  • A box of cake mix (the kids love Funfetti)
  • Frosting (again, Funfetti for us)
  • A box of two dozen ice cream cones (with flat bottoms so they’ll stand up on a cookie sheet)

To bake them, we put a 1/4 cup of batter (it won’t look like enough, but it is) into each ice cream cone and baked them on a cookie sheet at 350 till the tops sprung back when touched (by me! No kids in the oven!) — about 25 minutes. I set them on a rack to cool while we watched a movie. Enchanted, if you must know.

After they were cooled we busted out the frosting. Did I mention speed was of the essence? Here’s how we did it:

  1. Holding the ice cream cone cupcake upside down, dunk it down into the frosting — right up to the edge of the ice cream cone
  2. Pull the cone back out of the frosting while twisting with your wrist
  3. Voila! You have a cute little twist on the top of your cupcake. Decorate with sprinkles and eat for breakfast save for a more appropriate time of day

Now then. Do these turn out the most amazingly professional looking cupcakes you’ve ever seen? Heck no. But it does let the kids get involved, and gets the cupcakes finished before you’ve they’ve eaten all the frosting with a spoon. Isn’t that a large part of the goal here? 😉 And these are great for parties! The ice cream cones keep the kids from getting their fingers messy, and there are no pans to grease, and no papers to dispose of.

Enjoy!

Guinness Cupcakes

You know this is going to be good, don’t you?

Adapted from Smitten Kitchen and LovesToEat.

You will need:

  • 1 cup Guinness beer
  • 1 cup (2 sticks) butter
  • 3/4 cup unsweetened cocoa powder
  • 2 cups all purpose flour
  • 2 cups sugar
  • 1 1/2 teaspoons baking soda
  • 3/4 teaspoon salt
  • 2 large eggs
  • 2/3 cup sour cream

Now:

  1. Preheat oven to 350 F
  2. Line 24 cupcake cups with liners
  3. In a heavy saucepan over medium heat, melt 1 cup of butter and pour in 1 cup  Guinness; bring to a simmer then whisk in cocoa powder till smooth. Set pan off the burner
  4. Whisk flour, sugar, baking soda, and salt in large bowl to blend
  5. Using electric mixer, beat eggs and sour cream in another large bowl
  6. Add slightly-cooled stout-chocolate mixture to egg mixture a little bit at a time and beat just to combine
  7. Add flour mixture and beat on slow speed for about one minute
  8. Using rubber spatula, scrape down bowl and fold batter until completely combined
  9. Divide batter among cupcake liners, filling them 2/3 to 3/4 of the way
  10. Bake until toothpick inserted into center of cupcake comes out clean — this took me about 20 minutes, but check after 15 just to be sure
  11. Put cupcakes on a rack until completely cooled

Now is a good time to revisit my previously mentioned lesson: Know Your Bakeware. I cooked 12 of these in my silicone Kitchenaid muffin pan; it was a wedding present and has never failed me. I also cooked 12 of these in my heart shaped stand-alone silicone muffin cups from Wilton. Although these worked beautifully for the cherry limeade cupcakes, something went horribly wrong here. See?

Lovely, right? I honestly have no idea what happened here. I used a scoop, so they were all filled with the same amount of batter. Any ideas? The only thing I did differently this time was to put paper liners in the silicone cups. Anyway, the good news is that all but four of them were salvageable with a little cleanup and a good cover of icing.

Speaking of icing! I used Wilton’s buttercream icing.

You will need:

  • 1/2 cup solid vegetable shortening
  • 1/2 cup (1 stick) butter or margarine softened
  • 1 tsp. vanilla extract (I don’t use the Wilton-recommended clear, just the regular stuff)
  • 4 cups sifted* powdered sugar (approximately 1 lb.)
  • 2 tablespoons milk

*A note on sifting: I hate sifting. So I don’t do it. A few seconds whirring around in the food processor breaks up any clumps, aerates the sugar and doesn’t make me want to spork my eyeballs out the way a sifter does.

To mix it up:

  1. In large bowl, cream shortening and butter with electric mixer
  2. Add vanilla and mix again
  3. Gradually add sugar, about 1/4 cup at a time, beating well on medium speed — adding it gradually helps incorporate it really well and keep it from being at all grainy when you’re done
  4. Scrape sides and bottom of bowl often (unless you have a cool Beater Blade. Which I don’t. Humph.)
  5. When all sugar has been mixed in, icing will appear dry. Add milk and beat at medium speed until light and fluffy. Keep bowl covered with a damp cloth until ready to use.

Now ice away to your heart’s content! I used disposable icing bags from Wilton, and a fantastic giant star tip I ordered on Etsy from Bake It Pretty. And it is giant. Here it is next to a 1-cup measuring cup:

So, the finished product:

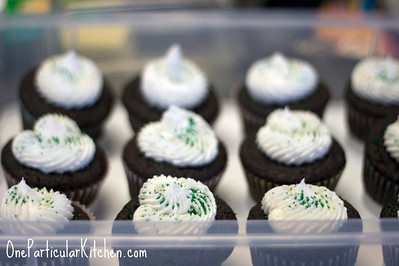
I set aside a few of these (including the four Fail Cupcakes) for us to enjoy at home, and the rest I took to The Yankee at work today in my awesome carrier from Costco:

And that’s it! Go bake, people! Oh, unless you have a brilliant theory as to what caused Cupcake Fail, in which case please leave me a comment and then go bake.

Cherry Limeade Cupcakes

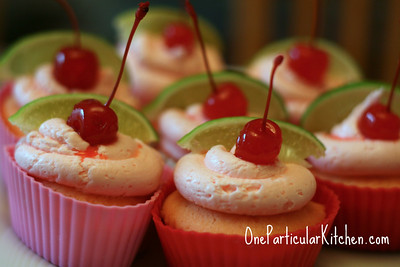
I may have actually squealed in delight when I saw how cute these turned out. Just maybe.

I found the recipe over at Annie’s Eats and knew I had to give it a shot. The love my sister and I have for cherry limeades at Sonic is somewhat legendary. She actually lived in LA (that’s Los Angeles — not Lower Alabama) for a few years (far! Too far!) and when she would come back to visit we would always go to Sonic and drink our weight in cherry limeades. And Sonic happy hour during the summer? Half price cherry limeade? Nearly. Every. Day. Point being, this recipe was a no-brainer choice for my baby sister’s birthday this year.

I stuck pretty closely to Annie’s recipe:

Cupcakes:

  • 3 cups cake flour (I actually used cake flour, which I never do)
  • 1/2 tsp. salt
  • 1 tsp. baking powder
  • 1/2 tsp. baking soda
  • 1 cup butter, at room temperature (I am a rebel and use salted all the time)
  • 1 cup sugar
  • 1/2 cup plus 2 tbsp. limeade concentrate
  • 3 eggs
  • 3/4 cup milk (I used whole milk because it’s all we keep in the house)

To make cupcakes:

  1. Preheat the oven to 350 degrees F and line or grease cupcake pans
  2. In a large bowl whisk together the cake flour, salt, baking powder and baking soda
  3. In the bowl of a stand mixer with the paddle attached, cream the butter until fluffy and smooth
  4. Add the sugar and beat on medium-high speed until creamed
  5. Add in the limeade concentrate and mix to incorporate
  6. Add the eggs one at a time, scraping down the bowl between additions
  7. Add in the flour mixture gradually, alternating with the milk, beginning and ending with the flour mixture.  Mix ingredients just long enough that everything is incorporated — don’t want to overmix it

Fill your prepared cupcakes pans and bake for about 15-20 minutes or until a toothpick inserted in the center comes out clean.  Cool cupcakes in the pans for 5-10 minutes, then completely on a wire rack

Now the syrup!

Lime syrup:

  • 3/4 cup limeade concentrate
  • 1/2 cup confectioners’ sugar

After the cupcakes are completely cooled, whisk together the limeade concentrate and confectioners sugar in a small bowl to make the lime syrup.  Poke several holes in the top of each cupcake with toothpicks and gently spoon the syrup over the cupcakes, a tiny bit at a time, allowing it to soak in. I didn’t end up using all the syrup, but feel free to do so! Annie tells me it’s up to your tastes.

Next…

Icing:

  • 3 3/4 cups confectioners sugar, sifted
  • 1/2 cup butter, softened
  • 4 Tbsp maraschino cherry juice

To make the icing, combine the confectioners sugar, butter and maraschino cherry juice in the bowl of a stand mixer.  Mix on low speed until sugar is mixed in, then increase to medium speed and beat until smooth.  You can add more maraschino cherry juice as needed to thin out the icing enough to be workable, but I found that 4 Tbsp was just fine. Optional: add red food coloring if desired; I didn’t because the pink of the cherry juice alone was fabulous.

Garnish:

  • fresh lime slices
  • maraschino cherries

Ice your cooled cupcakes, and garnish with lime slices and maraschino cherries, if your little heart desires. I absolutely did desire — this put them over the top from great cupcakes to OMG THOSE ARE FABULOUS cupcakes. I love them!